 Petit Labs
Part 5. Materials
Using static textures
If we are not just doing 3D geometry demos or business diagrams, we want our objects to look more realistic. We may want to build houses or get a nice ground in our world.
The solution is to dress our objects in textures, bitmap images such as photographs or painted surfaces. You may use a photograph of a brick wall as a texture for a plane to create realistic looking wall in your game. As another example, you may want to present photos on cubes or planes as a slideshow. There are many uses for bitmaps in a 3D application, and Sandy is prepared to meet the demands.
Let's start with our universal cube and use a painting to dress it up. We reuse the code from the earlier experiments, and just dress the cube in a BitmapMaterial.
Let's start with a well known painting for our first texture. La Gioconda
In our first we will import the image and use it from the assets library.
We open the File/"Import to library" dialog

Then we have to make the image accessible for ActionScript. This is done by right clicking on the image in the library and selecting "properties".

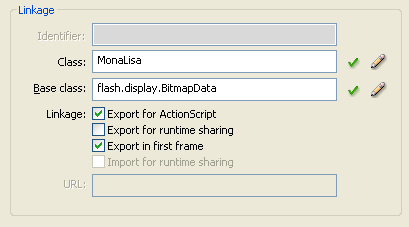

In the Bitmap Properties dialog, we tick the "Export for ActionScript" check
box.
In AS3 the linkage is not done by name, but through a class, so we type in a
class name, here "MonaLisa". This class will be automatically created for
us, which we are informed about, when we click OK.
When we want to extract and use the bitmap from the library, we just have to instantiate the MonaLisa class.
So keeping the rest of the code from the earlier experiments, here is the new createScene method.
	private function createScene():Group
	{
		var root:Group = new Group();
		box = new Box( 'box', 60, 60, 60, PrimitiveMode.TRI, 2);

		var texture:BitmapData = new MonaLisa(1,1);
		var material:Material = new BitmapMaterial( texture );
		var app:Appearance = new Appearance( material );
		box.appearance = app;

		box.enableNearClipping = true;
		root.addChild( box );
		return root;
	}
The BitmapMaterial constructor takes a BitmapData object as argument, and can also use MaterialAttributes and a precision setting, which influences the perspective distortion of the bitmap. The attributes and precision arguments are optional.
We get the image from the library by instantiating the MonaLisa class, and the result is a BitmapData object ( we need to import flash.display.BitmapData ). Now, what the heck are the arguments (1, 1) to the MonaLisa constructor, you might ask.
Well, this is a peculiarity in the Flash compiler. It requires width and height values passed to the automatically created class, although these values are never used. You could pass any values here, just to make the class compile.
As you can see I propose to keep the near clipping enabled, to get a nice clipping of polygons. Now go ahead and test the result! Rotate with the mouse and zoom with the Up and Down arrow keys.
On the cube to the right, a light attribute is added to the material.
This is the change we do to make the material react to light.
	var materialAttr:MaterialAttributes =
		new MaterialAttributes(
				new LightAttributes( true, 0.1 ) );

	var texture:BitmapData = new MonaLisa(1,1);
	var material:Material = new BitmapMaterial( texture, materialAttr );

	material.lightingEnable = true;

	box.enableBackFaceCulling = false;
As you can see I have set the ambient light level fairly low. Higher values will burn out the colors when the light hits the surface straight on. The light in Sandy is quite rudimentary at this point, but better treatment of light is expected in a later versions.
To have a nicer experience when we zoom into the cube, we can disable back
face culling. That way the front material will double as back face material.
Note that the light doesn't reach into the cube, which is fairly dark.
[ToDo j�mf�r precision - diskutera precision och more polygons - mayby a sidebar ?]
Transparency
Sometimes you want to have your objects more or less transparent, and you have a few options to accomplish this. You can use a PNG image with transparency or you can take any image and set the transparency value of the BitmapMaterial. If you have worked with bitmap filters in Flash, you may want to know that BitmapMaterial internally uses ColorMatrixFilter to make the bitmap transparent.
To make our texture more or less transparent, we call its setTransparency method, passing an alpha value between 0 and 1, where 1 means opaque and 0 fully transparent.
Here is the createScene method again:
	private function createScene():Group
	{
		var root:Group = new Group();
		box = new Box( 'box', 60, 60, 60, PrimitiveMode.TRI, 2);

		var texture:BitmapData = new MonaLisa(1,1);
		material = new BitmapMaterial( texture );

		var app:Appearance = new Appearance( material );
		box.appearance = app;
		box.enableNearClipping = true;
		root.addChild( box );
		return root;
	}
Oops! Where is the transparency setting?
Well, I thought we should try a little interactivity here, and let the user change the alpha value on the fly. For this purpose we need a slider with an on change event handler.
Hunting the web, I found Ryan Lee's AS3 Slider, which looks quite useful. I have copied the Slider component from Ryans example to the movie's library, and imported necessary classes.
	import fl.controls.Slider;
	import fl.events.SliderEvent;
Here is the code to install the slider.
	private function addSlider(){
		//instantiate slider
		var alphaSlider:Slider = new Slider();
		//position slider
		alphaSlider.move(20,185);
		// control if slider updates instantly or after mouse is released
		alphaSlider.liveDragging = true;
		//set size of slider
		alphaSlider.setSize(150,0);
		//set mininum value
		alphaSlider.minimum = 0;
		//set maximum value
		alphaSlider.maximum = 100;
		//set tick position interval, you do not have to set this
		alphaSlider.tickInterval = 5;
		//set start value
		alphaSlider.value = 100;
		// this is a listener that broadcasts evertime an event changes
		alphaSlider.addEventListener(SliderEvent.CHANGE, changeAlpha);
		//add slider to stage
		addChild(alphaSlider);
	}
We are setting the physical data, such as position and size. We also have to set the max, min and start values and we may set tick interval, if we want to. I first tried to set the interval to 0 - 1, because this is the alpha interval we want to use. That doesn't work, because the slider uses integers, so the minimum step is 1.
We also tell the slider to fire events while we drag its thumb, so we can have an immediate response to changes.
We listen for changes in the slider position, by subscribing to SliderEvent's. The event handler is changeAlpha.
	private function changeAlpha(e:SliderEvent){
		material.setTransparency( e.target.value/100 );
	}
Every time the user moves the slider, the event handler is called, and we pass the new value to the setTransparency method of the material. Note that for the handler to access the material, we have to make it an instance variable. Look at the results.
The line is drawn directly on the stage, to show the transparency.
In the right example above, back face culling is disabled.
box.enableBackFaceCulling = false;
Textures with transparency
It's a good thing that we are able to use an alpha channel to change transparency of the materials we dress our objects in. As we shall se later on, we can do much more than that, using bitmap filters.
Sometime we would like to use transparency that already exists in the original image. We may have a PNG or GIF image with a palette based transparency. In an image tool, such as PaintShop Pro or PhotoShop, we flag one specific palette color to be interpreted as transparent, usually the background color.
What will happen if we use such an image as the texture in a BitmapMaterial? Let's test it!
The Magritte image we will use here is prepared in PaintShop Pro, and with 32 bits per pixel and with palette transparency for the background. Palette transparency means that one specific color is fully transparent. The PNG format also supports alpha transparency, which means a variable transparency.
We import the image to the movie's library as before, and use it to dress
our object.
Here is the appearance, culling and clipping part of the createScene method:
	//var texture:BitmapData = new MagritteGIF(1,1);
	var texture:BitmapData = new Magritte(1,1);
	var material:Material = new BitmapMaterial( texture );
	var app:Appearance = new Appearance( material, material );
	box.appearance = app;
	box.enableBackFaceCulling = false;
	box.enableNearClipping = true;
 Ren� Magritte
The sober Magritte man is applied as front and back material, and the back face culling is disabled, so we can look inside the cube. The transparency of the original is preserved.
Texture mapping and UV coordinates
Looking at all our cube examples, we notice that setting the appearance property of the cube to a certain texture, applies the same texture to all sides. This is not at all the only way it could be done. One alternative would be to stretch the texture around the Box primitive, to cover its vertical sides and leave the top and bottom surfaces empty.
What happens if we dress a cone or sphere in the same texture? The author of a primitive has to decide how textures are mapped to a 3D object. Before we explore texturing further, lets take a look at how texture mapping is done.
A 3D object, or rather 3D surface, is represented by polygons in 3D space, normally triangles. The primitives in Sandy are built from rectangles ( the QUAD mode ) or triangles ( the TRI mode ). The former may give some performance gain, while the latter yields better perspective distortion. The points in space defining the polygons are defined by vertices. A vertex contains the position x, y, z, but also other geometric information, such as the 2D representation of the point on the screen.
Corresponding to the vertices, the object has UV coordinates. These are relative coordinates on the image corresponding to the vertices of a certain polygon. They are used to cut out the part of the bitmap that should be mapped to a certain polygon.
So the author of a primitive decides what UV coordinate relates to which
vertex.
The UV coordinates for the Box primitive goes between 0 and 1 in both
directions for each side. The UV coordinates are relative, so that ( 0,0 )
corresponds to the upper right corner of the bitmap and ( 1,1 ) to the lower
right corner. This way all sides gets the same texture, as we have seen.
This also means that if you know exactly what you are doing, you can change the
way a texture is mapped on an object, by changing the UV coordinates for all
vertices.
Let's see how MonaLisa is draped around a cylinder, a cone and a sphere. The
stage is a little longer and camera view port is set 500 x 200.
The camera position is set at z = - 300.
The cylinder and the sphere are moved to the left and right respectively.
	cyl  = new Cylinder("cylinder", 60, 150, 15);
	cyl.x = - 150
	cone = new Cone("cone", 60, 150, 15 );
	sphere = new Sphere("sphere", 60);
	sphere.x = 150
The LightAttribute has useBright set to false with the ambient light level at 0.4.
	var materialAttr:MaterialAttributes =
			new MaterialAttributes(
				new LightAttributes( false, 0.4 ) );
The rotation at mouse press, used for the cube is now used for all objects, so we are able to see them from all sides. Back face culling is disabled for the cone, so we can get see the texture on the inside as well.
For the Cylinder and the Cone ( which is just a special case of the Cylinder ), the UV coordinates are set so that the texture by default wraps around the curved surface, and pasted to the top and bottom surfaces. If you read the API documentation, you will find that the last parameter for the constructor can change that. Setting the p_bWholeMapping to false have the effect that the texture is mapped to each face separately. Go ahead and test what that means!
For the sphere, the texture is wrapped, as well as it can be, around the whole sphere.
Further reading on vertices, UV coordinates and texture mapping can be found on the Wikipedia.
Different textures on different faces
Sometimes you want to have different textures on different parts of your object. This means that you'll have to find what polygons should be dressed in one texture and which ones in another. Let's return to the box and look at it with no material set.
We create the scene in the simplest possible way.
	private function createScene():Group
	{
		var root:Group = new Group();
		box = new Box( 'box', 60, 60, 60, PrimitiveMode.TRI, 2 );
		root.addChild( box );
		return root;
	}
If we don't apply any material to the box, we get the default appearance with a WireFrameMaterial.
We use the TRI mode and a quality setting of 2. For the Box primitive this means that each side is divided in 2 x 2 rectangles which in turn are divided in two to make the triangular polygons. This gives us 4*2 = 8 polygons per side of our cube.
If we set the quality to 3, each rectangle is divided one more time to give us 4 x 4 rectangles, in turn divided in triangular polygons, for a total of 16 * 2 = 32 polygons.
A Shape3D has a property aPolygons, an array containing all its polygons. If we are lucky, the constructor of the Box primitive has ordered the polygons in such a way that polygons for one side follow consecutively. We try this by applying a material to the first 8 polygons in the aPolygons array.
Here is the code to try that.
	// BitmapMaterial with light attributes
	var materialAttr:MaterialAttributes =
			new MaterialAttributes(
				new LightAttributes( false, 0.6 ) );

	var texture:BitmapData = new MonaLisa( 1, 1 );
	var material:Material = new BitmapMaterial( texture, materialAttr );

	material.lightingEnable = true;
	var app:Appearance = new Appearance( material );

	// Apply the appearance to selected polygons
	var polygons = box.aPolygons;
	for( var i:Number = 0; i < 8; i++ ){
		polygons[i].appearance = app;
	}

	box.enableBackFaceCulling = false;
	box.enableNearClipping = true;
With back face culling disabled, we look at the inside of the cube. By
setting the light attribute useBright to false, we avoid making the inside
too dark.
Now we can dress the other sides as well, with another image for a change.
So let's add another image to the movie library and the following code to
the createScene method.
The result is seen to the right above.
	var texture2:BitmapData = new Berra( 1, 1 );
	var material2:Material = new BitmapMaterial( texture2, materialAttr );
	var app2:Appearance = new Appearance ( material2 );

	// Apply the second material to some selected polygons as well
	for( i = 8; i < 24; i++ ){
		polygons[i].appearance = app2;
	}
Berra is the automatically generated class, that represents the new image.
I'll leave it as an exercise for my clever readers to dress the rest of the
sides with different color materials, and to make one side completely
transparent without the wire frame lines at the polygon edges.
Update after the release of Sandy 3.0.1
The 3.0.1 was a maintenance update with bug fixes, but also added some new nice features. Among them a simplified way of getting and dressing up parts of primitives.
To paste different images on different sides of a Box, we no longer have to calculate which polygons belong to the same side. If we call the getFace method of a 3D object, we get a PrimitiveFace and we can apply an appearance to it directly.
Here is the new createScene method for texturing different pages with different images from the internal library of the SWF.
  private function createScene():Group
  {
	var root:Group = new Group();
	box = new Box( 'box', 60, 60, 60, PrimitiveMode.TRI, 2);

	// BitmapMaterial with light attributes
	var materialAttr:MaterialAttributes =
			new MaterialAttributes(
				new LightAttributes( false, 0.6 ) );

	var texture:BitmapData = new MonaLisa(1,1);
	var material:Material = new BitmapMaterial( texture, materialAttr );
	material.lightingEnable = true;
	var app:Appearance = new Appearance( material );

	var texture2:BitmapData = new Berra(1,1);
	var material2:Material = new BitmapMaterial( texture2, materialAttr );
	material2.lightingEnable = true;
	var app2:Appearance = new Appearance ( material2 );

	box.getFace(0).appearance = app2;
	box.getFace(1).appearance = app;
	box.getFace(2).appearance = app;
	box.getFace(3).appearance = app2;

	box.enableBackFaceCulling = false;
	box.enableNearClipping = true;
	root.addChild( box );
	return root;
  }
Using external images
Using textures that we load dynamically can be advantageous. It makes the SWF smaller and it loads faster. We can offer the user something to look at while we load the external assets. This is essential if we have to load heavy bitmaps or many bitmaps. In a game, for example, we may go from one place or level to another, using lots of textures. In such a case, we want to load images on demand, to save storage and time. We can also easily change the textures we use at any time, without having to recompile the SWF. So let's see how to use external assets to dress our generic cube.
 We are going to use two images, one
side of the famous Brillo box, and one portrait of the likewise famous pop artist.
We are loading the images from the "asset" sub directory, using a Loader.
We are going to use two images, one
side of the famous Brillo box, and one portrait of the likewise famous pop artist.
We are loading the images from the "asset" sub directory, using a Loader.
We then listen for the COMPLETE event, fired by the Loader, when the image is
completely loaded. In the event handler we apply the loaded texture to the
polygons we like. Here we are going to apply the brillo image to all sides
of a cube, except one, on which we paste the artist portrait.
We start by importing some mew classes that we need.
	import flash.display.Loader;
	import flash.net.URLRequest;
The createScene method will only create the 3D objects, and maybe set some properties. We have to wait for the images to load before we can create and apply the bitmap materials. Here is the createScene method called by the application class constructor.
	// Create the root Group and the object tree
	private function createScene():Group
	{
		var root:Group = new Group();
		box = new Box( 'box', 60, 60, 60, PrimitiveMode.TRI, 2);

		box.enableBackFaceCulling = false;
		box.enableNearClipping = true;
		root.addChild( box );
		return root;
	}
The interesting stuff happens in a new loadImages method and the event handler for the image loader. The loadImages method is called after the createScene method.
   //  Load the  images
   function loadImages()
   {
	var loader1:Loader = new Loader();
	loader1.contentLoaderInfo.addEventListener( Event.COMPLETE, loadComplete );
	loader1.load(new URLRequest('brillo.png'));

	var loader2:Loader = new Loader();
	loader2.contentLoaderInfo.addEventListener( Event.COMPLETE, loadComplete );
	loader2.load(new URLRequest('andy.png'));
   }
Two loaders are created, and we add COMPLETE listeners to their
contentLoaderInfo objects. We can use the same handler for both, if it can
identify the images.
The call to the loader's load method starts loading the image. It takes an
URLRequest with a complete or relative url as argument. Here the images is
found in the same directory as the swf.
We don't know which image is loaded first, but we know that as soon as an image is loaded, the loader fires a COMLETE event, and the loadComplete handler is called.
   // Take care of the textures as they are loaded.
   function loadComplete(event:Event):void {
	var target = event.target;
	var name:String = target.url;
	name = name.substring(name.lastIndexOf("/")+1).split(".")[0];

	var texture = target.loader.content.bitmapData;
	var app:Appearance = new Appearance( new BitmapMaterial( texture ) );

	if( name == "andy") {
		for ( var i:Number = 0; i < 8; i++ ){
			box.aPolygons[i].appearance = app;
		}
	}
	else{
		for ( i = 8; i < 48; i++ ){
			box.aPolygons[i].appearance = app;
		}
	}
   }
The Event object carries with it some useful information. The first we save is the target, which is the LoaderInfo object, that fired the event.
We have to check which image was delivered, to apply it to the right set of polygons, so we extract the name taking the part of the url, containing the file name and split it at the period. The names are "brillo" and "andy", so we can decide where to apply them.
We then extract the bitmap from the loader object: "target.loader.content.bitmapData",
and create an Appearance with the image as texture in a BitmapMaterial.
If we got the "andy" image, we apply it to the first eight polygons, building up one side of the cube, otherwise to the rest of the polygons.
Comment on copyright.
The Brillo box here is just a little bit unorthodox. The original work of art, if one exist, doesn't feature the artist. As you know, this is not a "ready made", but a wooden copy of a supermarket box, and and named as art by Andy Warhol. It has been shown on many exhibitions, and if for example the Museum of Modern Art in Stockholm, needed a few more, they just asked the artist, and he would grant "license fabrication" of new ones.
Later copies of the Brillo box in cardboard was done by others. It is safe to say that a publication like this one doesn't infringe on any copyright. You may regard this as art :)
Next up are the animated materials using movie clips and videos.